Custom Product Tour
Custom Product Tour
You can create product tours to familiarize your users with the various features and functionalities of the self-service portal. This helps your organization reduce overhead on training users and thereby aids in better utilization of resources in your service departments.
This tour is designed as a collection of steps that you can customize by using text, images, and videos. It is shown to the users on the landing page after logging into the self-service portal. If enabled by the admin, an option to access or re-launch the tour will be available under the Profile Settings user panel as well.
Role Required: SDAdmin
SupportCenter Plus provides default tour content in English. Depending on your requirements, you can create new content in any language.
You can mark any tour as the default tour.
Contacts will be shown the tour based on their language settings. If the tour content is not available in the contact's language, then the default tour will be shown.
You can perform various actions on the tours either from the list view or from the editor.
• Access List View and Editor
• Create Help Tour
• Configure Repeat Frequency and Relaunch Settings
• Edit Help Tour
• Preview Help Tour
• Disable Help Tour
• Delete Help Tour
• Make as Default
• View Tour Details
Access List View and Editor
Typical List View
To access the tour list view, go to Admin > General Settings > Advanced Portal Settings > Customization.
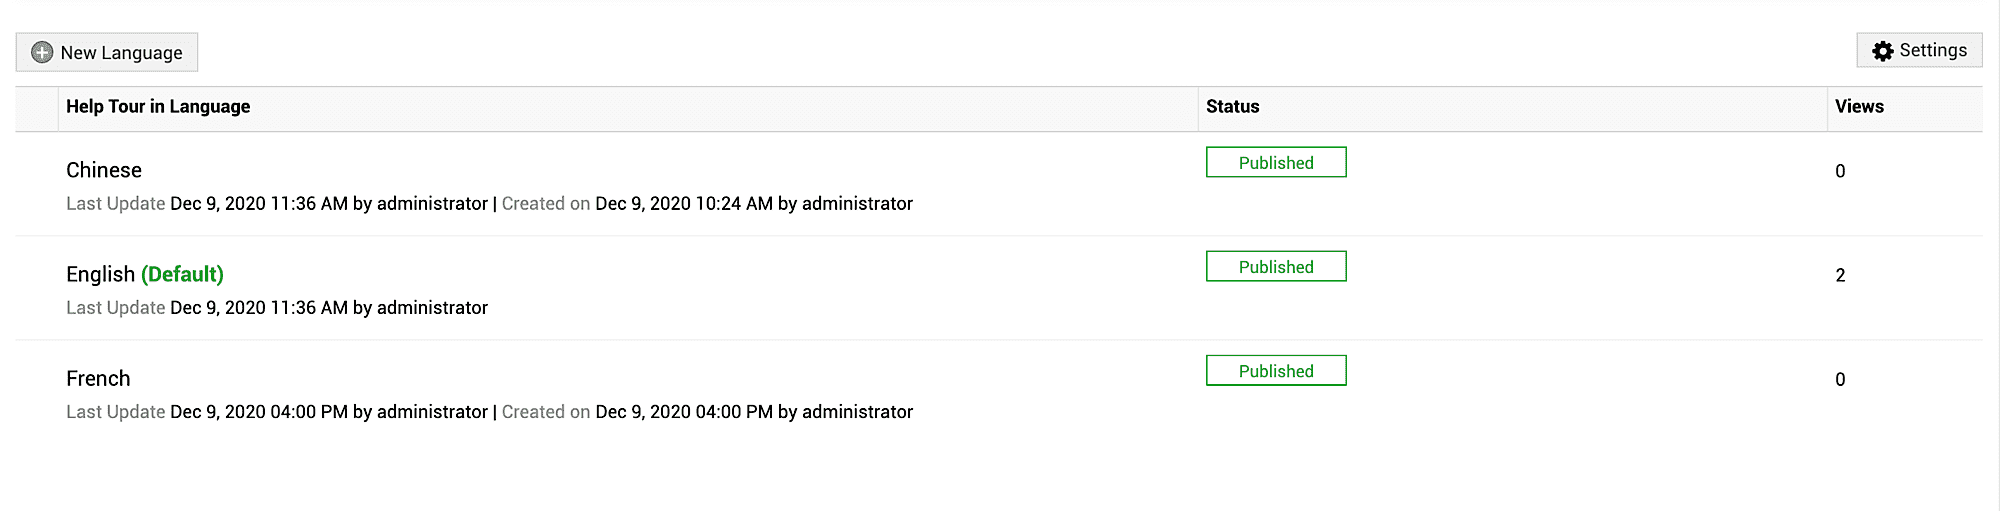
On the list view, you can see details such as language, status, and the number of views and perform various operations such as creating, editing, deleting, and disabling tours. Also, you can configure repeat frequency and relaunch settings from the list view.
On the list view, you can see details such as language, status, and the number of views and perform various operations such as creating, editing, deleting, and disabling tours. Also, you can configure repeat frequency and relaunch settings from the list view.
To access editor:
Go to the list view and click Customize Now under the Customize Help tour section. Here, you can either click the language of the preferred tour to open the existing tour or click New Language and select the preferred language to open the editor to create a new tour.
Typical Editor
Create Help Tour
To create and publish a new tour:
- Go to the tour list view.
- Click New Language and select the preferred language to open the tour editor.
- For each step, provide the following details.
Field | Description |
Step Name | Provide a relevant name for the step. This is used to track the steps and will not appear on the tour. This is a mandatory field. |
Title | Provide a relevant title for the step. This will be the title that appears on the tour. This is a mandatory field. |
Content | Add text-based content for the tour. |
- To add an image, click Insert Image and choose your preferred image.
- To add a video, click Embed Video, add the relevant code to the textbox, and click Insert.
- Finally, click Publish.
To add a new step, click Save and Add New or click  on the left pane.
To delete or disable a step, click on the step-selector card on the left pane and choose the appropriate option.
To delete or disable a step, click
To reorder the steps, hover over the preferred step-selector card on the left pane, click  and drag it to the preferred position.
Images and videos added to a step will appear in the preview box.
You can use the alignment buttons to align the image and video as required.
Images and videos added to a step will appear in the preview box.
You can use the alignment buttons to align the image and video as required.
Configure Repeat Frequency and Relaunch Settings
Based on your organizational requirements, you can repeat the product tour for your users after a specific number of days and also provide an option for users to relaunch the tour when required under the User Profile settings.
To configure these,
To configure these,
- Click Settings on the top-right corner of the list view.
- On the pop-up that appears, configure the following options as required:
• To set repeat frequency, choose the number of days from the appropriate drop-down. The available options are 7, 15, and 30 days. To avoid repeating the tour, select Never.
• To provide an option for users to relaunch the tour from their Profile Settings, select the Allow users to view help from the profile settings option. - Finally, click Save.
To edit a Help tour:
- Go to the list view and click the language of the preferred tour.
- Make necessary changes and click Save for the required steps.
- Finally, click Publish.
When making changes to the published tour, the status changes from Published to Draft.
At any time, you can discard the current changes and restore the published version by clicking and then choosing Restore Published.
For English tour, you can also restore the default content bundled with the product by clicking and then choosing Restore Default.
At any time, you can discard the current changes and restore the published version by clicking
For English tour, you can also restore the default content bundled with the product by clicking
Preview Help Tour
- From the list View: Hover over the preferred tour, click
and select Preview.
- From the Editor: Click Preview on the top-right. If you have made changes to the tour content, you can also choose Draft review or Published Preview by clicking the dropdown adjacent to Preview.
Disable Help Tour
From the list View: Hover over the preferred tour, click  and select Disable.
From the Editor: Click and then select Disable.
From the Editor: Click
Delete Help Tour
From the list View: Hover over the preferred tour, click  and select Delete.
From the Editor: Click and then select Delete.
From the Editor: Click
Make as Default
From the list view: Hover over the preferred tour, click  and select Make Default.
View Tour details
To view more information, go to the editor by clicking the language of the preferred tour and click  and then select More Info.
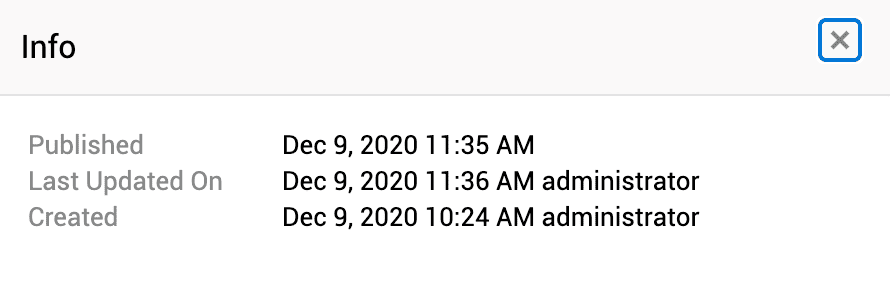
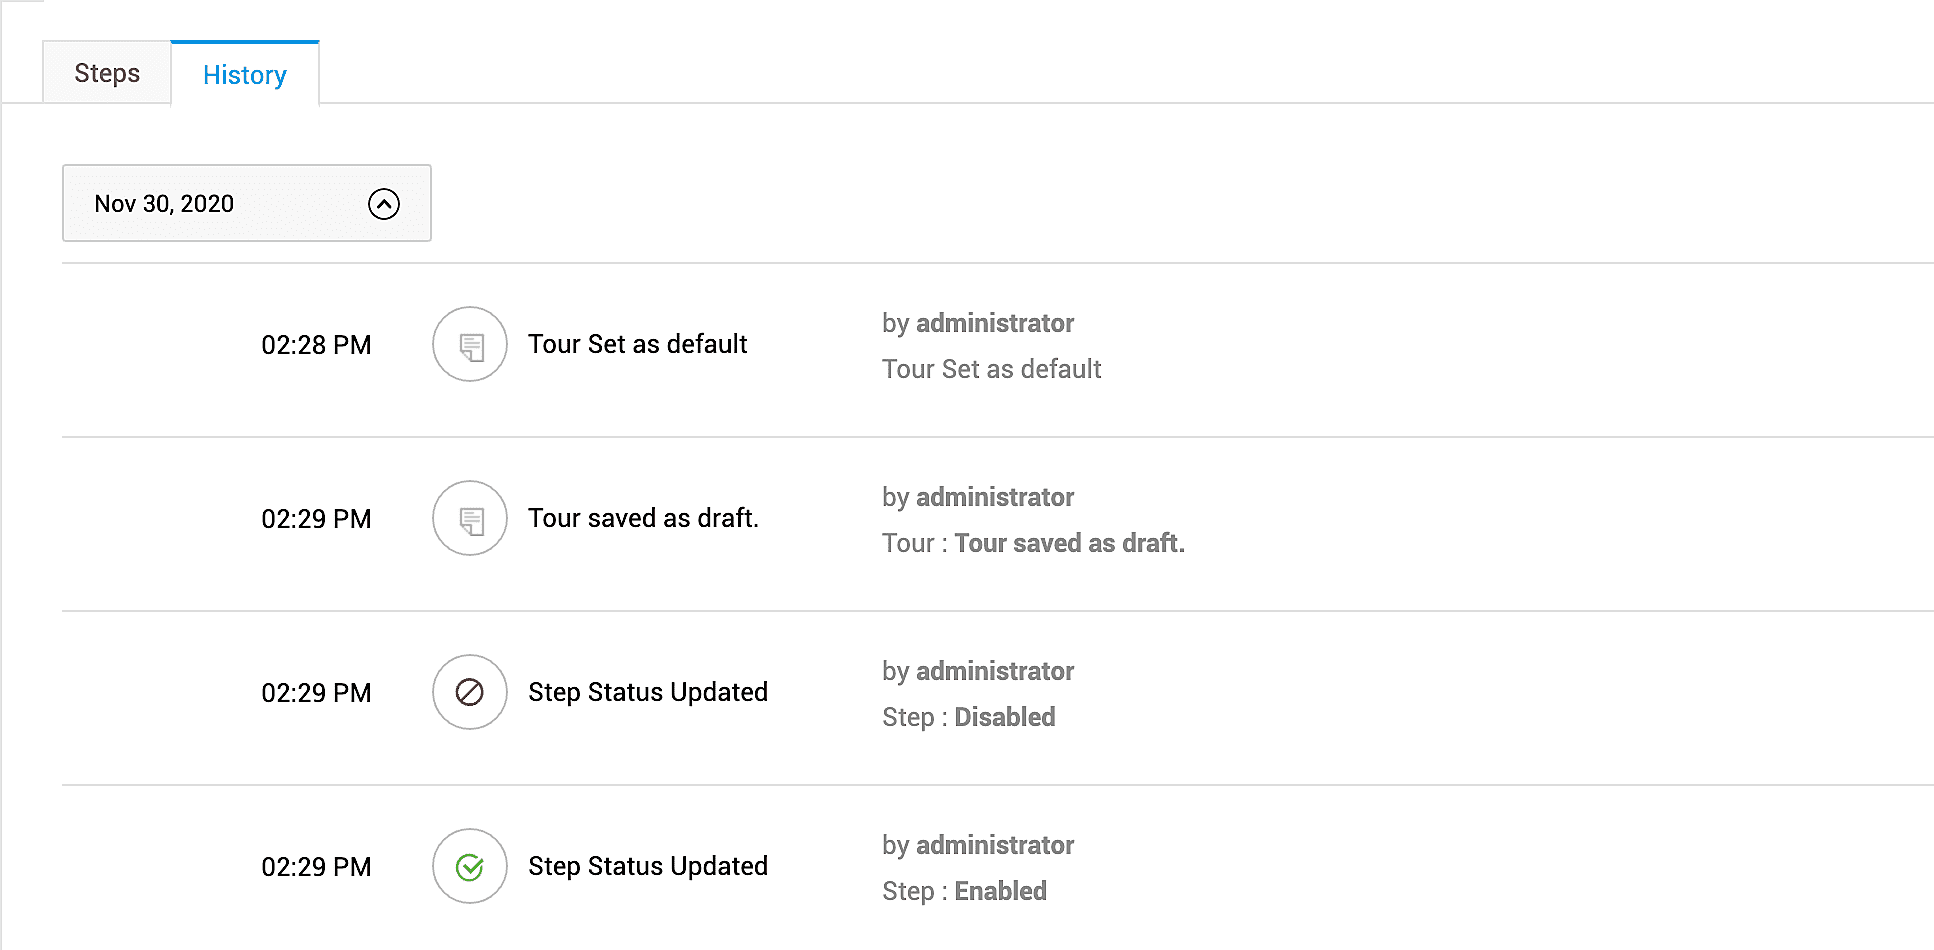
Alternatively, you can view the complete history of changes made to the tour content under the History tab.
Related Articles
Product Type
Product type allows you to group products of the same type. For example, you can classify different mobile phones from different brands into a common type. You can create your custom product types. To create a new product type: 1. Go to ...Custom Triggers - Requests
Custom Triggers are used to configure automated actions for incoming requests or records that fulfill certain preconfigured criteria. You can automate several processes, such as sending customized email notifications, creating a new request based on ...Custom Modules: Custom Configurations
Custom configurations allow you to create admin entities that can be referred to in other modules. Custom configurations work similarly to other admin entities such as status, priority, and impact that can be referred to in the request module. The ...Custom Modules
SupportCenter Plus has built-in modules such as Requests, Solutions, and configuration entities such as Users, Status, Priority, Level, and Mode. Organizations might want to create additional entities to suit their business processes and workflows. ...Custom Actions
Custom actions refer to user defined actions that can be performed on different entities across modules. For a custom action to be performed on an entity, it should be used with automation rules, subject to the availability of support. Availability ...